Miniwindows in MUSHclient - Create / move / resize
Written by Nick Gammon - July 2008. Updated September 2010.
On this page:
See also:
- Introduction
- Drawing shapes
- Drawing text
- Drawing images
- Hotspots
- Helpful graphics functions
- Blending images
Introduction
Before starting scripting with miniwindows, let's look at some basic technical details.
- Miniwindows are created with a specific width and height in pixels. This controls how much memory is allocated to the offscreen bitmap. If you want to resize the miniwindow it can be recreated with the same name, in which case the previous contents are lost, or you can use WindowResize. The size can be from 0 x 0 pixels to any size you like.
- Each miniwindow has a name, which must be used in all subsequent operations relating to that miniwindow. The name can be any character string, of any length. The name cannot be an empty string. In order to avoid various plugins written by different authors happening to choose the same name, we recommend you choose the plugin ID as part of the name, for example:
win = "main_window_" .. GetPluginID ()
Note: To use the "movewindow.lua" module (which lets you easily drag miniwindows around the screen) the name needs to be made of characters that can be saved as a variable (so its position can be remembered). Thus you are recommended to stick to alphabetic or numeric characters (which GetPluginID will return) and the underscore character. Also the name needs to start with a letter (A to Z).
If you use GetPluginID () to generate a name, note that this will be the empty string if you are testing outside a plugin, so you need to prepend something to the front of the GetPluginID string, or the name will not be valid.
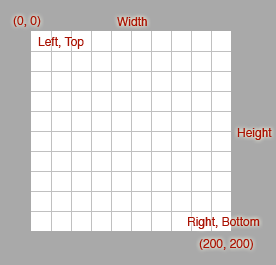
Create or resize a miniwindow
WindowCreate function prototype:
long WindowCreate(BSTR Name, long Left, long Top, long Width, long Height, short Position, long Flags, long BackgroundColour);
This creates (or re-creates) a miniwindow of the given name. It is not initially shown so it will be invisible until you call WindowShow. You can re-create an existing miniwindow by simply calling WindowCreate with the same name (thus letting you change various aspects of it). You can also use WindowResize to resize it, or WindowPosition to move it.
- Name - the name we are calling it - needed for all subsequent operations on this miniwindow. We suggest you use GetPluginID () to get a unique name for this window. If you plan to use more than one window in a plugin (or are testing outside plugins), simply prepend "A", "B", etc. to the plugin ID. For example:
name = "A" .. GetPluginID ()
(This may be 0,0 if you are using auto-positioning). The window may be subsequently moved with the WindowPosition function.
These are required, and lock in the size of the window for subsequent drawing operations. Any attempts to draw outside these boundaries will be clipped.
| Value | Purpose | Lua symbol |
|---|---|---|
| 0 | Stretch to output view size | |
| 1 | Stretch with aspect ratio | |
| 2 | Strech to owner size | |
| 3 | Stretch with aspect ratio | |
| 4 | Top left | |
| 5 | Center left-right at top | |
| 6 | Top right | |
| 7 | On right, center top-bottom | |
| 8 | On right, at bottom | |
| 9 | Center left-right at bottom | |
| 10 | On left, at bottom | |
| 11 | On left, center top-bottom | |
| 12 | Centre all | |
| 13 | Tile |
Lua note: Instead of numbers you can use the above "symbolic constants" in Lua (version 4.52 onwards).
Positions 0 to 3 probably aren't that useful (they are also used for loading background images), and position 13 (tile) would probably not be used often either. However you might use these if you set the "draw underneath" flag described below, so that a subtle window could appear under main output window.
The corner positions (4, 6, 8, 10) always put the miniwindow in that corner, and 12 (centre all) always puts the window dead-centre of the main output window.
The other positions (5, 7, 9, 11) are used for centering the window between the corners. MUSHclient tries to fit the miniwindow exactly in the middle between any corner windows. Also, if more than one window is designated as centered on that side (eg., the right side) it tries to fit them all in, evenly spaced.
If the centered windows can't all be fitted, some are temporarily hidden until they do, in order to avoid overlaps.
| Value | Purpose | Lua symbol |
|---|---|---|
| 1 | Draw underneath. If set, the miniwindow is drawn beneath the scrolling text in the output window. | |
| 2 | Absolute location. If set, the miniwindow is not subject to auto positioning (so the Position argument is ignored), and it is located exactly at the Left, Top position designated in the function call. By setting this bit you have absolute control over where the window will appear. | |
| 4 | Transparent. If set, whenever a pixel in the contents of the window matches the BackgroundColour, it is not drawn, and the text underneath shows through. This lets you make odd-shape windows like stars or circles, by filling the outside (the part you don't want to see) with the background colour. | |
| 8 | Ignore mouse? If set, mouse clicks in this miniwindow are ignored (for the purpose of implementing hotspots). | |
| 16 | Keep hotspots? If set, and the window already exists (that is, you are re-creating one of the same name) then any existing hotspots are retained. |
Lua note: Instead of numbers you can use the above "symbolic constants" in Lua (version 4.52 onwards).
Example of creating a window
win = "test_" .. GetPluginID ()  -- get a unique name, ensure not empty if outside plugin
WindowCreate (win, 0, 0, 200, 200, miniwin.pos_center_all, 0, ColourNameToRGB("white"))  -- create window
WindowShow (win,  true)  -- show it
You can try this example in the Immediate window (Ctrl+I) and you should see a 200 x 200 pixel white window appear, centered (position 12). Outside a plugin, GetPluginID will return an empty string, which is why you need to put something before the string returned by GetPluginID.
If you want to see the grid lines I used in my examples, the following extra lines will do that:
  -- Grid
  for i = 1, math.max (WindowInfo (win, 3), WindowInfo (win, 4)) / 20 do
    WindowLine (win, i * 20, 0, i * 20, WindowInfo (win, 4), 0xC0C0C0, miniwin.pen_solid, 1)
    WindowLine (win, 0, i * 20, WindowInfo (win, 3), i * 20, 0xC0C0C0, miniwin.pen_solid, 1)
  end -- for
You should really put the code to draw the lines before the call to the WindowShow function, otherwise the window is not redrawn immediately. Alternatively, put Redraw () after drawing the grid, which forces a window redraw.
When can I draw to a miniwindow?
Once the window has been created by a call to WindowCreate, you can draw to it anytime. You may find it useful to clear the window and start again "on a blank slate". For example:
WindowRectOp (win, miniwin.rect_fill, 0, 0, 0, 0, ColourNameToRGB("white"))
This clears the entire window to white.
What happens when I re-create an existing miniwindow?
You can do a WindowCreate on an existing miniwindow with no problems. This will have the following effects:
- The existing offscreen image will be discarded, and the memory it used freed.
- A new offscreen image will be created, using the new dimensions. Thus you can use WindowCreate to resize a window. For example, you might do this for an inventory window, if you get more inventory.
- The image will be cleared to the background colour you specify.
- Any hotspots you added are removed, unless you set the flag miniwin.create_keep_hotspots mentioned above. The assumption is that if you are starting drawing from scratch, any hotspot items will probably appear in a different place.
- The window's "show" flag is set to false. Thus you need to call WindowShow before it will become visible.
The following items are retained:
- Any installed fonts (see WindowFont)
- Any installed images (see WindowLoadImage and WindowCreateImage)
- Any existing hotspots, if you set the flag miniwin.create_keep_hotspots.
Delete a miniwindow
WindowDelete function prototype:
long WindowDelete(BSTR Name);
You can delete a miniwindow by calling WindowDelete, supplying the miniwindow name. All resources used by that miniwindow will be freed, and the output window redrawn.
Show a miniwindow
WindowShow function prototype:
long WindowShow(BSTR Name, BOOL Show);
This shows or hides the designated window. A window redraw is scheduled.
- Name - the name of an existing miniwindow.
- Show - true to display the window at its designated place, false to hide it.
Creating and showing windows are separate operations. This is because you may want to maintain something like an inventory list, or quest objectives, but not necessarily have space on the screen for them at a particular moment. By creating the window early on, you can draw to it (offscreen), add or remove items, and generally keep it up-to-date as events occur on the game. However when the player actually wants to see the window s/he may hit a hotkey or type an alias, which simply causes the window to be shown (or hidden).
Calling WindowShow forces a window refresh, so the screen will be updated with the new miniwindow (or absence, as the case may be).
If you have changed the miniwindow, you may not want to call WindowShow (in case they currently want it hidden). In this case you can call Redraw () instead, to cause the main output window to be redrawn, without changing the status of any miniwindows.
Examples:
WindowShow (win, true)  -- show window, refresh screen
WindowShow (win, false) -- hide window, refresh screen
List all miniwindows
WindowList function prototype:
VARIANT WindowList();
This returns a list of all miniwindows created for this world. You could use this to find which windows have been created, and then use WindowInfo to find information about each one.
Example:
-- show all windows
windows = WindowList()

if windows then
  for _, v in ipairs (windows) do
    Note (v)
  end
end -- if any
Get information about a miniwindow
WindowInfo function prototype:
VARIANT WindowInfo(BSTR Name, long InfoType);
This returns information about a particular miniwindow. You might use this to find where the window is on the screen, what its size is, whether it is visible, and so on.
- Name - the name of an existing miniwindow.
- InfoType - the information you want:
- 1: Left (from WindowCreate)
- 2: Top (from WindowCreate)
- 3: Width
- 4: Height
- 5: Show flag
- 6: Is it hidden right now?
- 7: Layout position code
- 8: Flags
- 9: Background colour
- 10: Where it is right now: left
- 11: Where it is right now: top
- 12: Where it is right now: right
- 13: Where it is right now: bottom
- 14: Where mouse last was (mouse down, mouse up or move) - X position - relative to miniwindow
- 15: Where mouse last was (mouse down, mouse up or move) - Y position - relative to miniwindow
- 16: Incremented each time items 14/15 are updated.
- 17: Where mouse was (during drag operation) - X position - relative to output window
- 18: Where mouse was (during drag operation) - y position - relative to output window
- 19: Hotspot ID of the hotspot currently being moused-over (empty string if none)
- 20: Hotspot ID of the hotspot currently being moused-down in (empty string if none)
- 21: Date/time the miniwindow was installed.
InfoType 10 to 13 are where the auto positioning last placed the window (the last time the main screen was refreshed).
The "show" flag is whether you want the window shown. Infotype 6 is whether it had to be temporarily hidden. This only applies to position codes 5, 7, 9, 11. The window will thus be visible if:
- The Show flag is true (Infotype 5)
- The "Is it hidden right now" flag is false (Infotype 6)
- It is actually positioned somewhere it can be seen
- Another window is not on top of it
Move a miniwindow
WindowPosition function prototype:
long WindowPosition(BSTR Name, long Left, long Top, short Position, long Flags);
This lets you move a miniwindow. This is only really useful if you are setting the "Absolute location" flag when creating it. In this case, if you notice the output window has been resized, you may want to resposition the window, without having to re-create it, and redraw all its contents.
- Name - the name of an existing miniwindow.
- Left, Top - the top/left corner to position it, inside the MUSHclient output window.
(This may be 0,0 if you are using auto-positioning).
- Position - a number indicating where you want the window positioned on the screen. Whenever the screen is resized or redrawn the contents of the window are drawn in the requested position:
Value Purpose Lua symbol 0 Stretch to output view size miniwin.pos_stretch_to_view 1 Stretch with aspect ratio miniwin.pos_stretch_to_view_with_aspect 2 Strech to owner size miniwin.pos_stretch_to_owner 3 Stretch with aspect ratio miniwin.pos_stretch_to_owner_with_aspect 4 Top left miniwin.pos_top_left 5 Center left-right at top miniwin.pos_top_center 6 Top right miniwin.pos_top_right 7 On right, center top-bottom miniwin.pos_center_right 8 On right, at bottom miniwin.pos_bottom_right 9 Center left-right at bottom miniwin.pos_bottom_center 10 On left, at bottom miniwin.pos_bottom_left 11 On left, center top-bottom miniwin.pos_center_left 12 Centre all miniwin.pos_center_all 13 Tile miniwin.pos_tile Lua note: Instead of numbers you can use the above "symbolic constants" in Lua (version 4.52 onwards).
- Flags - this can be a combination of the following bits (that is, add them together if you want more than one):
Value Purpose Lua symbol 1 Draw underneath. If set, the miniwindow is drawn beneath the scrolling text in the output window. miniwin.create_underneath 2 Absolute location. If set, the miniwindow is not subject to auto positioning (so the Position argument is ignored), and it is located exactly at the Left, Top position designated in the function call. By setting this bit you have absolute control over where the window will appear. miniwin.create_absolute_location 4 Transparent. If set, whenever a pixel in the contents of the window matches the BackgroundColour, it is not drawn, and the text underneath shows through. This lets you make odd-shape windows like stars or circles, by filling the outside (the part you don't want to see) with the background colour. miniwin.create_transparent 8 Ignore mouse? If set, mouse clicks in this miniwindow are ignored (for the purpose of implementing hotspots). miniwin.create_ignore_mouse 16 Keep hotspots? If set, and the window already exists (that is, you are re-creating one of the same name) then any existing hotspots are retained. miniwin.create_keep_hotspots Lua note: Instead of numbers you can use the above "symbolic constants" in Lua (version 4.52 onwards).
Resize a miniwindow
WindowResize function prototype:
long WindowResize(BSTR WindowName, long Width, long Height, long BackgroundColour);
This lets you resize a miniwindow. This can be used to change the size of a window in response to a click and drag in a "resize" hotspot. The window's width and height are changed to the new values. The existing window contents is retained in the top-left corner (therefore it may be clipped if you are sizing smaller). If you are sizing larger any new area is filled with the colour BackgroundColour.
- Name - the name of an existing miniwindow.
- Width, Height - the width and height of the window, in pixels. The example window above is 200, 200. The minimum size is 0, 0.
- BackgroundColour - this is the RGB code for the colour that any area not previously visible is filled with.
Other pages about miniwindows
- Introduction
- Drawing shapes
- Drawing text
- Drawing images
- Hotspots
- Helpful graphics functions
- Blending images
![[Home]](/images/home.gif)