Recently I found problems uploading sketches to my Arduino Mega2560 board. I was getting messages like this:
Some research led me to this site:
http://www.cbxdragbike.com/arduino/bootloaderdocs/index.html
On that is another bootloader which you can download from:
http://www.cbxdragbike.com/arduino/bootloaderdocs/ATmegaBOOT_168_mega2560.hex.zip
Unzip this file (giving ATmegaBOOT_168_mega2560.hex) and remember where you put it.
[EDIT] This may work better for large sketches:
https://github.com/arduino/Arduino-stk500v2-bootloader
In particular, this hex file (RH-click, "save as" stk500boot_v2_mega2560_Sept_2011.hex):
http://www.gammon.com.au/Arduino/stk500boot_v2_mega2560_Sept_2011.hex
If you use this file you don't need to edit the boards.txt file (mentioned below) because this supports the same baud rate as the original Mega2560 bootloader.
I also had some problems uploading the bootloader using the Arduino IDE and my USBtinyISP device, so I fetched out my AVR Dragon board. You should be able to get one of these from Digi-Key or a similar supplier for around $US 51.
I had previously soldered on some extra headers and a ZIF socket, but as long as you have the 6-pin ISP header you should be good to go. You also need a 6-core IDC cable (as in the photo below) or just connect together with 6 female-to-female connector wires.
Connect up like this:

Close-up to show the orientation of the wiring:
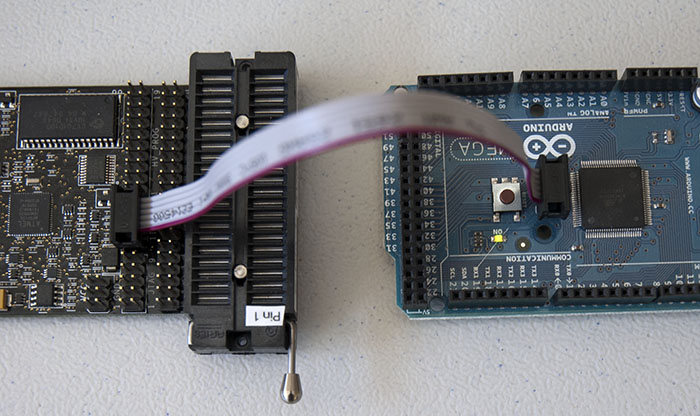
Note that the Dragon board doesn't supply power by default, so you need to connect up your target board to a power supply. In my case I used a 9V battery.
You need AVR Studio to do the programming. I used version 4.18. I found that the newer version 5 was a lot bigger, and had some features not implemented properly.
You should be able to download AVR Studio from here, but if not, search the Atmel site to find it. This download is free.
http://www.atmel.com/dyn/products/tools_card.asp?tool_id=2725
Once installed, and invoked, go to the Tools menu and select "Program AVR":

Select your AVR Dragon and click Connect:

Select the appropriate device type, ISP mode, and make sure the ISP frequency is not too high. I used 1 MHz.

Click on the "Read Signature" button to check that all is working OK.

Go to the Program tab, and click on the "..." button to select a file to program with:

Now select the .hex file you downloaded above:

Hit the "Program" button and the file should be uploaded to the device, and then verified. I found this only took about two seconds.

Now you should be able to exit the programming dialogs in the AVR Studio, then disconnect your Arduino, and plug it into a USB port.
As mentioned on the web page I quoted above, you will need to find your "boards.txt" file and add this entry:
Restart the Arduino IDE program to get it to read this file, and then select that board from the Tools -> Board menu.
Now you should be able to use the new bootloader to upload your sketches. Well, it worked for me. :)
Binary sketch size: 18958 bytes (of a 258048 byte maximum)
avrdude: stk500_2_ReceiveMessage(): timeout
avrdude: stk500_2_ReceiveMessage(): timeout
avrdude: stk500_2_ReceiveMessage(): timeout
Some research led me to this site:
http://www.cbxdragbike.com/arduino/bootloaderdocs/index.html
On that is another bootloader which you can download from:
http://www.cbxdragbike.com/arduino/bootloaderdocs/ATmegaBOOT_168_mega2560.hex.zip
Unzip this file (giving ATmegaBOOT_168_mega2560.hex) and remember where you put it.
[EDIT] This may work better for large sketches:
https://github.com/arduino/Arduino-stk500v2-bootloader
In particular, this hex file (RH-click, "save as" stk500boot_v2_mega2560_Sept_2011.hex):
http://www.gammon.com.au/Arduino/stk500boot_v2_mega2560_Sept_2011.hex
If you use this file you don't need to edit the boards.txt file (mentioned below) because this supports the same baud rate as the original Mega2560 bootloader.
I also had some problems uploading the bootloader using the Arduino IDE and my USBtinyISP device, so I fetched out my AVR Dragon board. You should be able to get one of these from Digi-Key or a similar supplier for around $US 51.
I had previously soldered on some extra headers and a ZIF socket, but as long as you have the 6-pin ISP header you should be good to go. You also need a 6-core IDC cable (as in the photo below) or just connect together with 6 female-to-female connector wires.
Connect up like this:
Close-up to show the orientation of the wiring:
Note that the Dragon board doesn't supply power by default, so you need to connect up your target board to a power supply. In my case I used a 9V battery.
You need AVR Studio to do the programming. I used version 4.18. I found that the newer version 5 was a lot bigger, and had some features not implemented properly.
You should be able to download AVR Studio from here, but if not, search the Atmel site to find it. This download is free.
http://www.atmel.com/dyn/products/tools_card.asp?tool_id=2725
Once installed, and invoked, go to the Tools menu and select "Program AVR":
Select your AVR Dragon and click Connect:
Select the appropriate device type, ISP mode, and make sure the ISP frequency is not too high. I used 1 MHz.
Click on the "Read Signature" button to check that all is working OK.
Go to the Program tab, and click on the "..." button to select a file to program with:
Now select the .hex file you downloaded above:
Hit the "Program" button and the file should be uploaded to the device, and then verified. I found this only took about two seconds.
Now you should be able to exit the programming dialogs in the AVR Studio, then disconnect your Arduino, and plug it into a USB port.
As mentioned on the web page I quoted above, you will need to find your "boards.txt" file and add this entry:
##############################################################
#	Added for Emartee in china
#	by Mark Sproul msproul@skychariot.com June 2010
mega2560.name=Arduino Mega2560
mega2560.upload.protocol=stk500
mega2560.upload.maximum_size=258048
mega2560.upload.speed=57600

mega2560.bootloader.low_fuses=0xFF
mega2560.bootloader.high_fuses=0xD8
mega2560.bootloader.extended_fuses=0xFD
mega2560.bootloader.path=atmega
mega2560.bootloader.file=ATmegaBOOT_168_mega2560.hex
mega2560.bootloader.unlock_bits=0x3F
mega2560.bootloader.lock_bits=0x0F

mega2560.build.mcu=atmega2560
mega2560.build.f_cpu=16000000L
mega2560.build.core=arduino
Restart the Arduino IDE program to get it to read this file, and then select that board from the Tools -> Board menu.
Now you should be able to use the new bootloader to upload your sketches. Well, it worked for me. :)