Note that if you are using "manual advance" of frames, then keystrokes and mouse clicks are ignored until the current picture has been fully drawn on the screen.
Press Command-period, Command-W, or the "Esc" key and the current slide show will stop. You will then have to re-scan or reprocess a tag file in order to view further pictures. If you wish to temporarily pause the display, use the "Hide" feature described elsewhere instead of stopping the show.
If you wish to stop the slide show and return to the Finder, just press Command-Q (Quit) in the usual way.
Press Command-A to toggle automatic advancing of pictures on and off. A message will briefly appear in the bottom right-hand corner of the screen to show what the new status is (Automatic or Manual advancing).
If you have an "extended" keyboard (one with function keys), you can press F6 to turn "automatic advance" on (pressing F5 turns "manual advance" on).
The advancing method (automatic or manual), and the delay between frames are remembered by QuickSlideshow for the next time you use the program.
To control the amount of time between pictures, use Command-D to set the "Delay" time in seconds. You are allowed to set a delay period in the range 0 to 600 seconds (i.e. zero to 10 minutes).
Note that setting the delay period very low (e.g. 0 seconds) will mean that the amount of time between frames is actually the time taken to decode the next picture (which can range from 1 second to about 5 seconds). Effectively then, a delay of "0" means "show the pictures as fast as possible". A reasonable setting for the delay amount is 5 seconds which is usually enough time to enjoy each picture.
Note that when "automatic advance" is activated you can still manually advance to the next picture by pressing "space", "return" or "enter", or clicking the mouse. You might use this technique in conjunction with a longer delay period (say, 30 seconds) to advance past boring pictures.
Alternatively, if you have the automatic advance set to a short period, say 3 seconds, and see a picture you want to admire, just hold down one (or more) of the following keys: Command, Option, Control or Shift.
While one of the above keys is depressed, the automatic advance is temporarily disabled. When you let go of the key, the program then waits for the delay period to elapse before advancing to the next frame (e.g. if the delay period is 3 seconds, there will be a further 3 second delay from the time you let go of the key).
To disable automatic advance, just press Command-A again or, if you have an extended keyboard, press F5.
To manually advance to the next picture, press any of the following keys: "space", "return", "enter", or any letter key in the range "A" to "Z".
Alternatively, click the mouse to advance, provided you can selected "Mouse click advances to next picture" in the "QuickSlideshow preferences" dialog box.
When using manual advance, if you click or press a key before the picture has been fully drawn, the click or key-press is discarded. This is so that you do not accidentally advance too quickly by pressing two keys in a row, or clicking twice by mistake. You must wait for the picture to complete drawing (and any information such as the file name to appear) before attempting to advance to the next picture.
If you press a "letter" key (i.e. "A" to "Z") this key is noted in memory, and remembered when (and if) you create a "tag" file. You can thus use the alphabetic letters to "tag" various pictures (e.g. "F" for Fish, "L" for Landscapes).
Press Command-H to toggle hiding the current picture. While the picture is hidden the menu bar and mouse reappear, and you can see the desktop in the normal way. Also, automatic advancing between pictures is disabled whilst the "Hide Picture" option is active. If QuickSlideshow is in the middle of decoding the next picture there may be a short delay (one or two seconds) until the current picture is hidden.
To return to the slide show, press Command-H again.
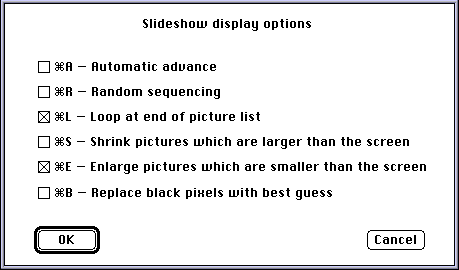
Press Command-L to toggle looping through the pictures. If the "Loop" option is active then once all pictures that you have selected have been displayed the display will start again from the start.
Press Command-R to toggle random sequencing of pictures on and off. A message will briefly appear in the bottom right-hand corner of the screen to show what the new status is (Random or Sequential advancing).
If you have an "extended" keyboard (one with function keys), you can press F8 to turn "random sequencing" on (pressing F7 cancels "random sequencing").
The sequencing method (random or sequential) is remembered by QuickSlideshow for the next time you use the program.
Random sequencing is very useful for viewing CDROMs with thousands of pictures. Without random sequencing you would always see the files at the start of the CDROM, and never the ones at the end (unless you watched for hours and hours!).
When random sequencing is active the next file to be shown is chosen randomly from the ones not yet seen. This guarantees that you will always see each file once before any are repeated.
Used in conjunction with the "looping" option you can leave your Mac turned on all day with a suitable CDROM mounted to see a random selection of pictures that is always interesting!
Do not use random sequencing of pictures if you are planning to reposition to a given file number by using the "Go to picture by number" command described under the section "Finding a picture by name or number".
When a picture that is too large to fit is being drawn on the screen QuickSlideshow automatically draws a 3D-style border around the picture as a visual indication that there is more of the picture available.
If you have an "extended" keyboard (one with function keys), you can press F9 to turn "display at full size" on (pressing F10 sets the option "Shrink pictures which are larger than the screen").
You can scroll around and see the rest of the picture by:
When scrolling becomes available
Comments to Gammon Software support
![]()
![]()
![]()